In this tutorial, we’ll explain what Workspaces & Panels are and how you can optimize listing information specific to your needs.
Skip to Tutorial Section:
- Panels Explanation & Overview
- Workspaces Explanation & Overview
- Rearrange Panels
- Stack Panels
- Resize Panels
- Removing Panels
- Save & Load Workspaces
Panels Explanation
One of the most beneficial features of uBuyFirst is having the ability to configure listing information anyway you need. In this tutorial, we’ll explain how to setup a basic layout to include all the essential item information within an eBay listing.
Panel Overview
uBuyFirst breaks listing information into 5 main categories (or search panels)
Basic Panels:
- Results – Basic listing records when found.
- Description – The description area of an eBay listing.
- Pictures – All pictures from an listing.
- Item Properties – Any other item information you wish to highlight.
- Buy / Make Offer Button – Goes directly to browser item page to checkout or purchase/make offer directly through uBuyFirst (if configured).
Additional Panels:
- Filters – Advanced filters for search results.
- Log – Log file containing error logs
- eBay Searches – Keywords search log
These panels are usually fixed to a main search panel where the basic panel info is displayed by default and the additional panels is tabbed to the original so that only item information is showing by default.
- All panels can be included or hidden by clicking VIEW > PANELS from the top ribbon navigation or removed by clicking the “X” button on the upper right panel window.
In addition to segmenting listing information within these panel, you’re able to do the following:
- Drag panels to different areas of the interface by clicking on the panel header and dragging.
- Resize each panel to fit your needs and/or PC monitor layout.
Layout Configurations (Work Spaces)
Workspaces are saved layout configurations that you can quickly apply with a click of a button. By default, uBuyFirst comes with two layout configurations already created for you. Also, you’re able to try different layout settings while saving your original configuration in case you want to revert back.
Try these default layout options to get a feel for various ways you can setup your layout. You can do this by going to VIEW > WORKSPACES and clicking on the two layout names with the suffix “(Default)”.
Layout configurations will also save the individual item fields within the RESULTS and ITEM PROPERTIES panels, panel sizing, font and text settings etc.
When you find a good combination that works for you, save the work space by clicking VIEW > WORKSPACES > CAPTURE WORKSPACE and enter a name for the work space.
-
To view which panels are currently active: – Click VIEW > PANELS
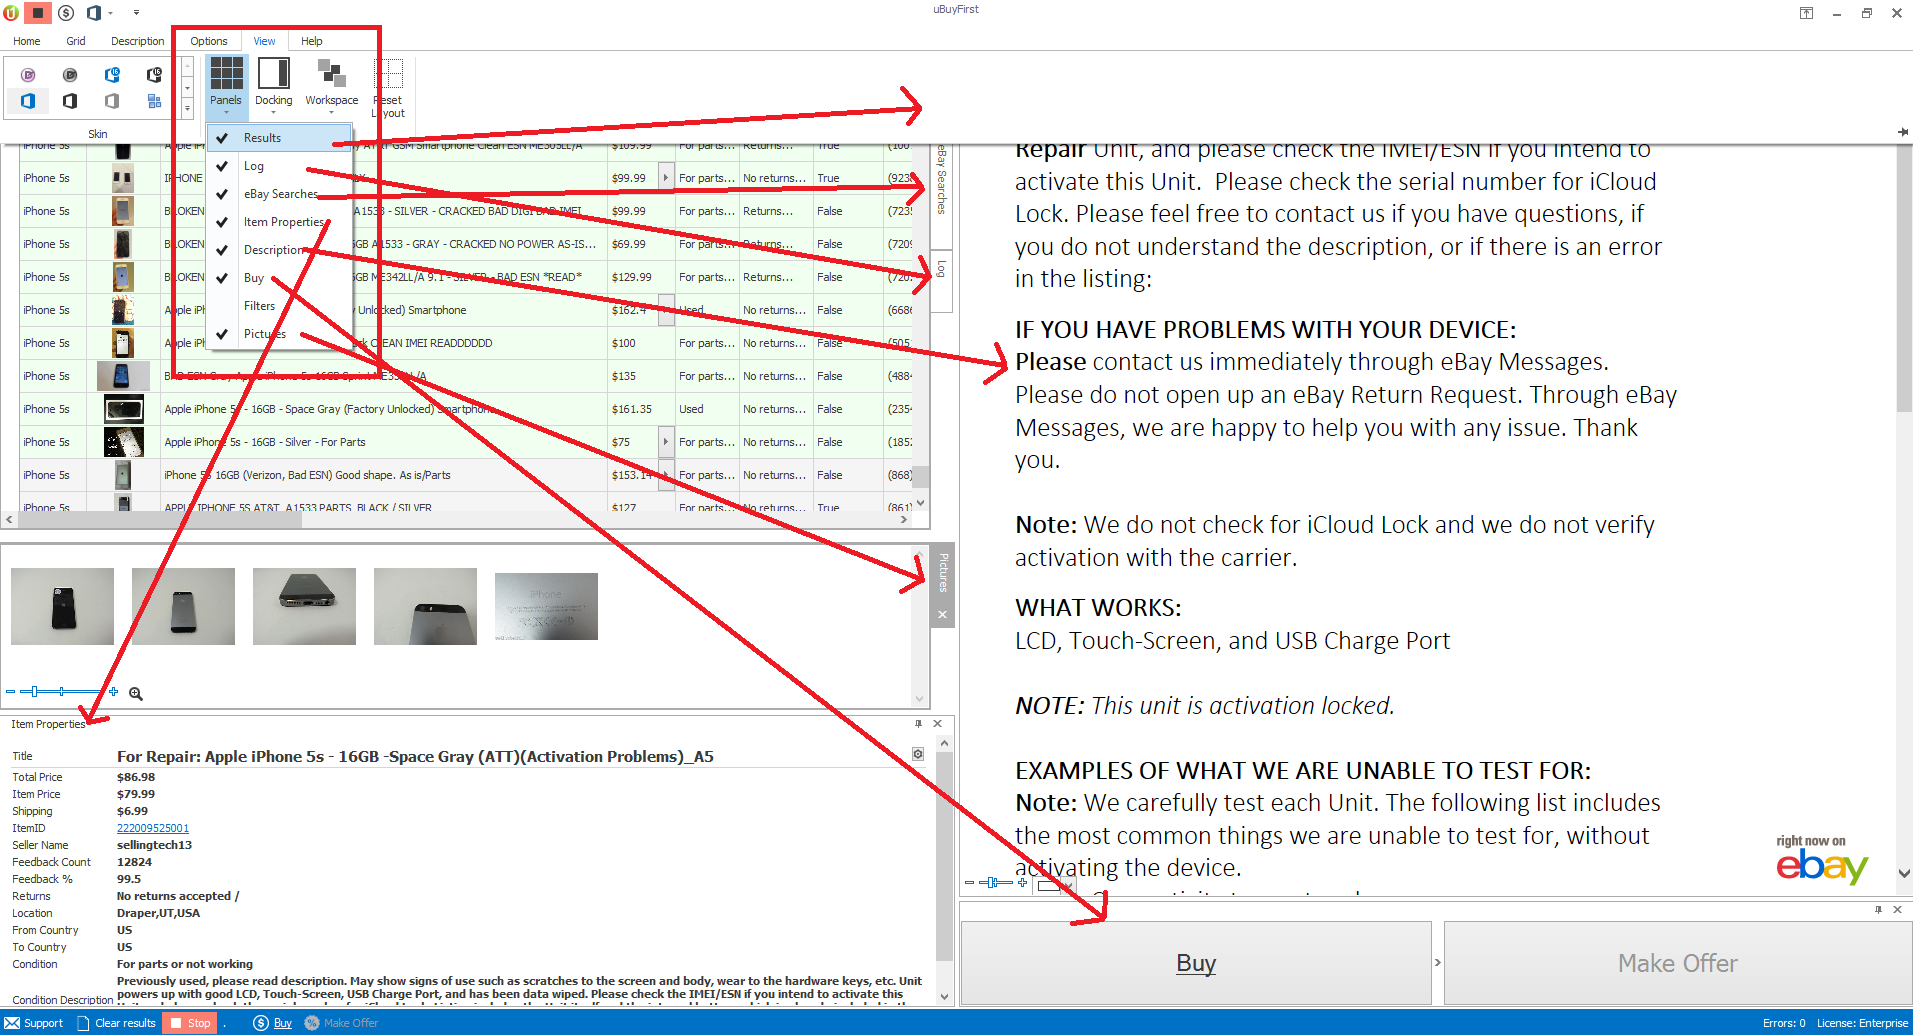
- Check marks will be present next to items that are active.
- The above picture shows these panels location.
- If the panel is not present and you would like it to be, simply click the panel name on the VIEW > PANELS menu and it will then popup or appear within the interface.
2. Rearrange Panels
To rearrange the panels to a different location, simply left click the panel and drag it to a location carousel and then select the location for the panel to reside.
Click here to view video full screen in new window
3. Stack Panels
Likewise you can stack panels so their “tabbed” within each location carousel.
Click here to view video full screen in new window
3. Resize Panels
Removing Panels
Click here to view video full screen in new window
4. Save & Load Workspaces
Anytime you make changes to the layout that you wish to use in the future, please save the workspace.
- If you’re saving for the first time: VIEW > Workspace > Capture Workspace and then give your layout a name and click ok.
- If you want to save over an existing file or configure other layout options, click VIEW > Workspace and then select the layout name you wish to use or click “Workspaces” for more options.
Click here to view video full screen in new window
http://screencast.com/t/UA9PAhp7ZSW