
AI-Powered eBay Listing Analysis — Detailed Setup (build V3.6.1.0)
How AI Setup Works.
Everything for one analysis lives in a single AI profile, built through a 3-step wizard: 1) AI Configuration (provider, model, API key, system prompt) → 2) Fields & Columns (what to send + which AI columns to show) → 3) Display Template. One extra piece — a filter — is what actually triggers the analysis on your searches.
Table of Contents #
- Overview
- Understanding the Complete Process
- Prerequisites
- Open AI Settings (first run)
- Create Your Prompt & Display Template
- Build the Profile — the 3-Step Wizard
- Adding AI Columns
- Create the Trigger Filter
- Start & Test
- Re-running One Listing
- Feedback & Traces
- Troubleshooting
- Best Practices
Overview #
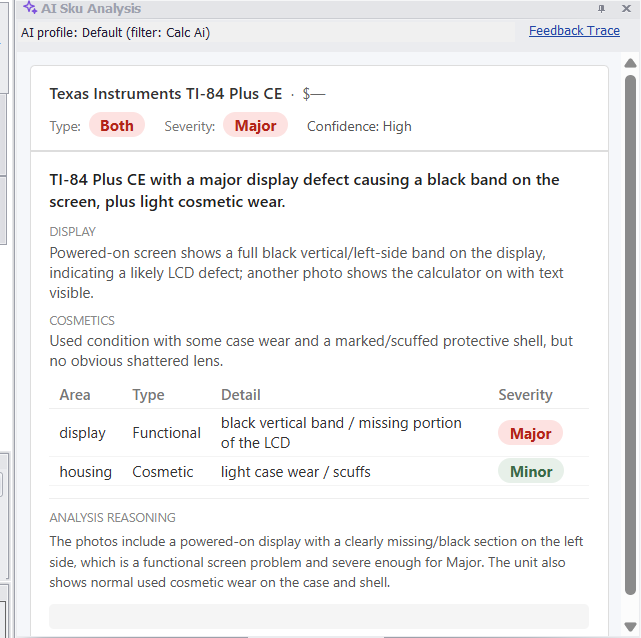
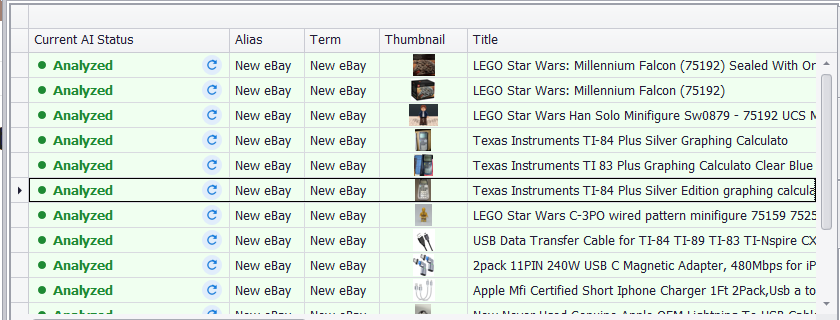
SKU Manager uses AI to analyze eBay listings in real time against your own business criteria. It reads whichever listing data you choose to send it — title, description and photos are the usual starting set, and you can add any of the other eBay fields (condition, price, brand, returns, item specifics…) — and returns its analysis two ways: a formatted readout in the AI Sku Analysis panel, and optional quick-decision AI columns in the results grid.
Two ways to see results #
Display Template (start here) #
AI Columns (add later) #
Understanding the Complete Process #
What you’re building #
To get AI analysis on your eBay results you set up one profile that ties these pieces together:
- System Prompt — instructions telling the AI how to analyze a listing (and which AI columns to output).
- Fields to send — which eBay data the AI receives.
- Display Template — HTML that formats the AI’s answer for the panel.
- Filter — triggers the analysis on the searches you choose.
The data flow #
eBay listing → fields sent → system prompt → JSON response → display template / AI columns → your analysis.
Mindset.
Your first goal isn’t perfection — it’s one working round-trip of data through the system. Get something simple running, then iterate.
Prerequisites #
- License: Enterprise license, whitelisted for SKU Manager.
- Chrome & Python: both are installed automatically by the application — Python sets itself up the first time you open AI Settings or IE Settings, not when the app first launches. It takes a few minutes; let it finish. You do not install either yourself.
- An AI API key: OpenAI (ChatGPT) is the recommended provider. Google, Anthropic and xAI are also offered. Generate the key and make sure billing is active.
- A Claude or ChatGPT account for creating and updating your prompt & display template.
Getting whitelisted #
- Go to Menu > Help > Subscription Info and copy your License Key.
- Submit it via Live Support on the uBuyFirst website and agree to the Terms.
- Wait for whitelist confirmation.
Open AI Settings (first run) #
1. Open the AI Settings dialog #
Open the uBuyFirst application and click the Data tab. In the Ai group, click AI Settings. (Internal-Endpoint users use the IE Python code group → IE Settings instead.)

Leave “Analyze New Listings Only” Selected.
It is the default. With Analyze initially loaded listings selected instead, every row already in the grid is sent to the AI when the server starts — each one is a paid call.
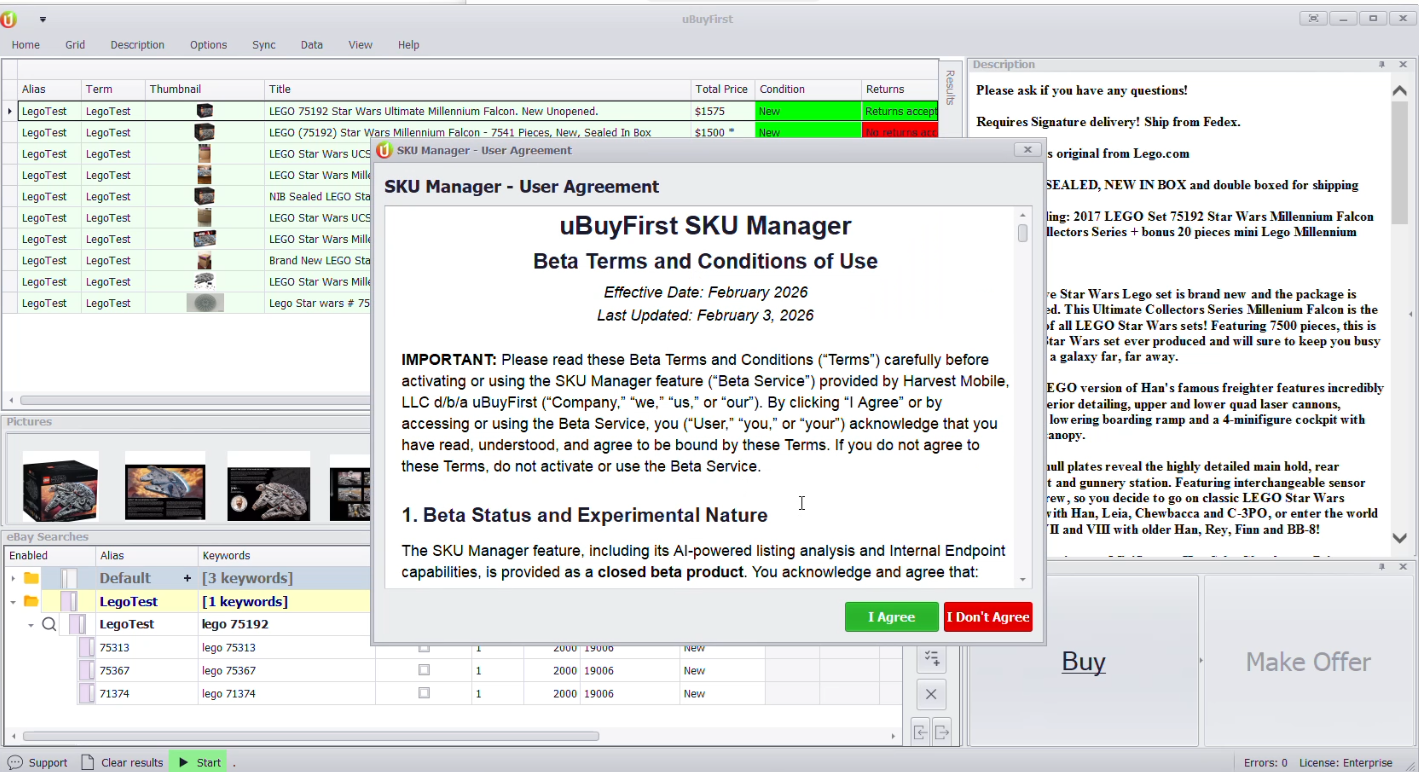
2. Accept the user agreement #
Read the SKU Manager – User Agreement, then click I Agree.
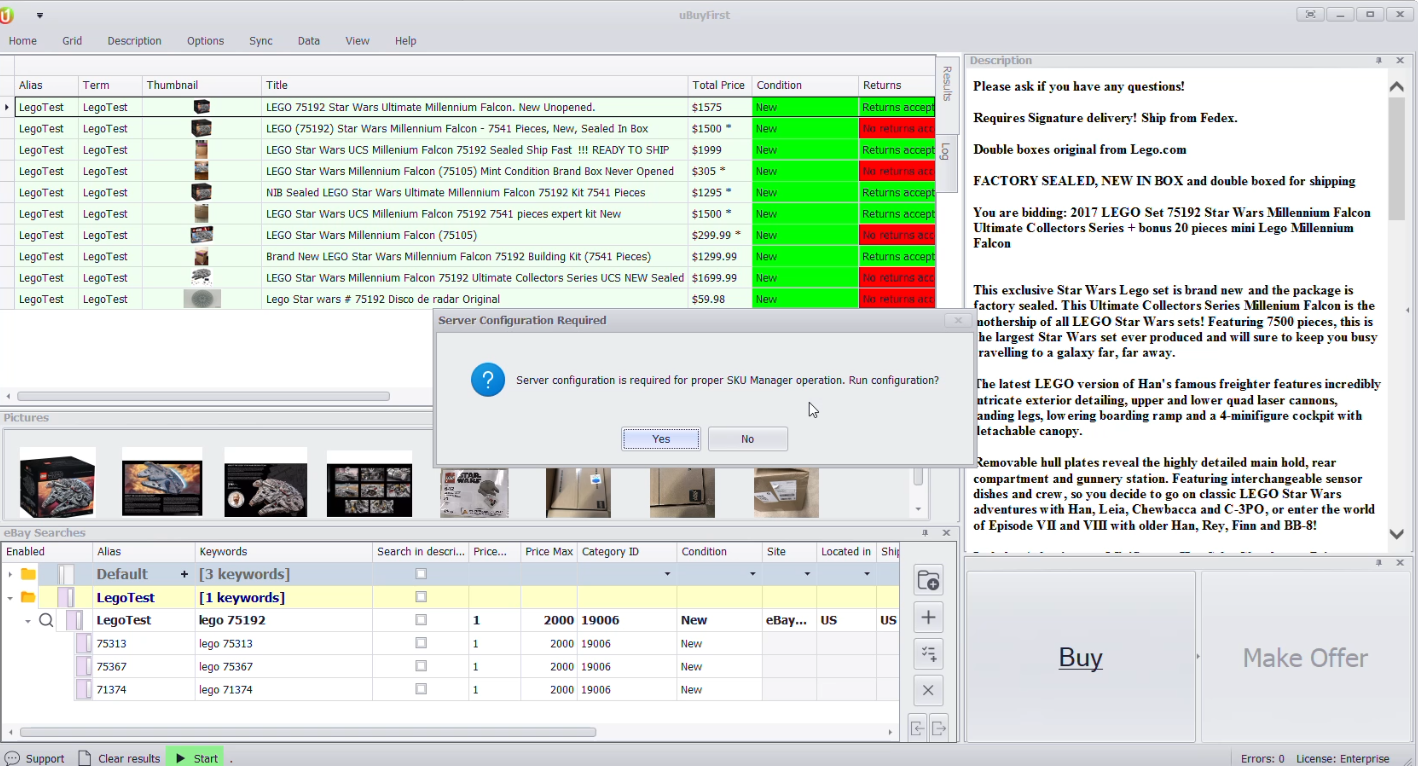
3. Let it configure the server (fresh install only) #
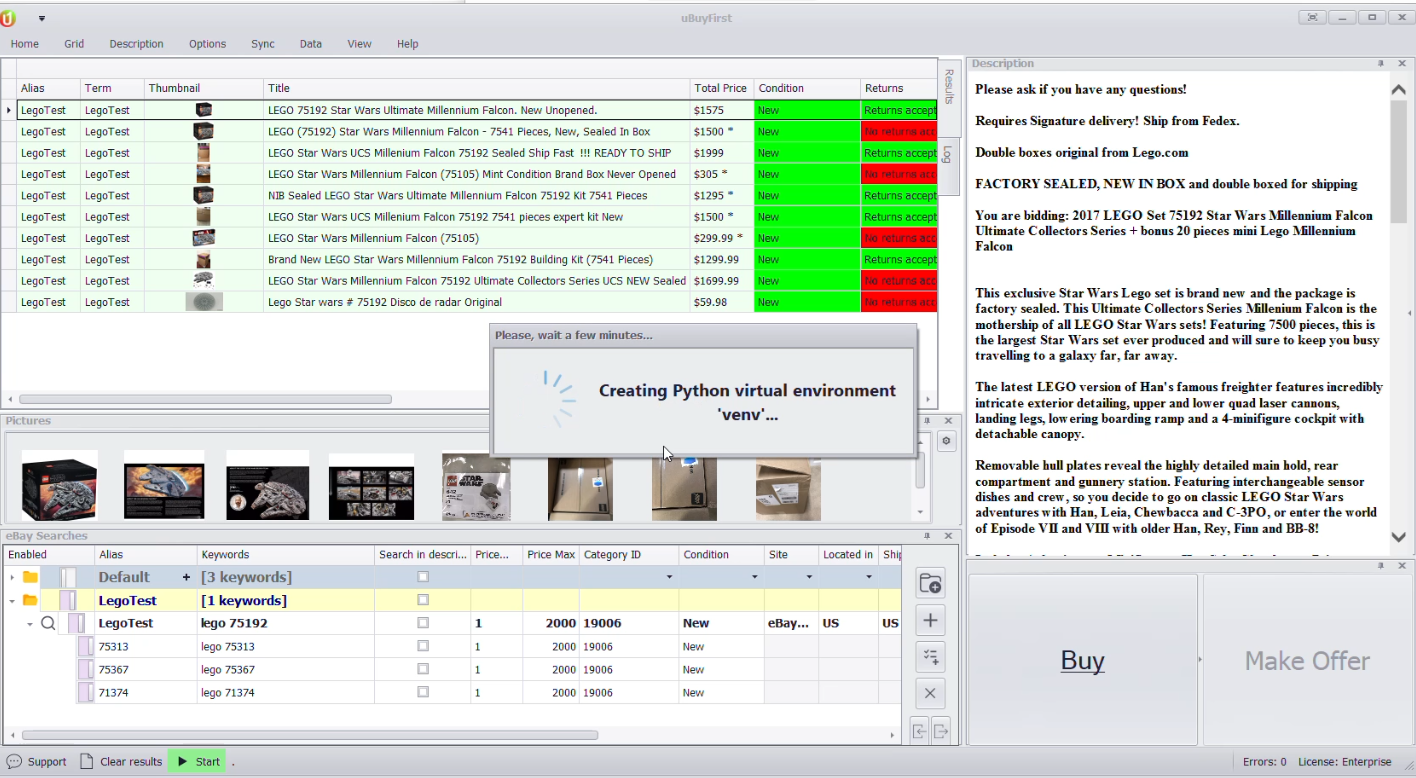
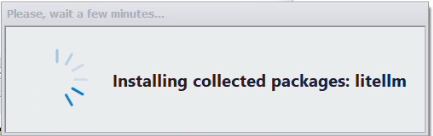
Click Yes on Server Configuration Required. On a fresh install, SKU Manager then builds the Python environment automatically and installs the required libraries — this takes a few minutes and is skipped on a reinstall. Don’t click anything while it runs.
Create Your Prompt & Display Template #
You create these two pieces before running the wizard, using an AI assistant loaded with our SKU Manager project knowledge. The prompt generates the data; the template displays it — they’re built together so they match.
1. Get the project knowledge #
- Download the SKU Manager Knowledge Package: documentation, working examples, and template patterns.
- Unzip it.
2. Set up your AI project #
Already Have the Project?
This is the same SKU Manager Assistant project used for Internal Endpoint. If you built it there, it already contains everything you need — skip straight to 3. Generate your first prompt & template. If not, set it up now and it will cover both modes.
Using Claude — go to Claude.ai → Projects → Create Project, name it “SKU Manager Assistant”, and upload all files from the package into the project’s knowledge. Start a chat inside that project and use the latest model with extended thinking.
Using our ChatGPT Custom GPT — open the SKU Manager Prompt/Template Assistant GPT (files already loaded).
3. Generate your first prompt & template #
Tell the assistant what you do and what matters:
I'm a professional buyer of [PRODUCT TYPE] on eBay and I want a prompt
and display template to analyze listings. Most important to me:
 - [key factor 1]
 - [key factor 2]
 - [key factor 3]
Start simple, just to get it working. Please create both the prompt
and the display template.
Keep the first version small — get a working round-trip, then add detail. The assistant returns a system prompt (with a proper JSON structure) and a matching HTML display template.
How Prompt and Template Connect.
Your prompt returns JSON, e.g.
{ "Can Return": "Yes", "Condition": "Good" }. Your template reads those fields and formats them for the panel. The assistant keeps the two in sync.
Build the Profile — the 3-Step Wizard #
Back in the AI Settings dialog the wizard opens on Step 1. On a first install the Profile Name is fixed at Default — you cannot rename it or create a second profile yet, so build your first analysis in Default. That is expected, not a problem. Once you have a working profile and New Profile / Copy are available, use those for your next one rather than overwriting a profile that already works.
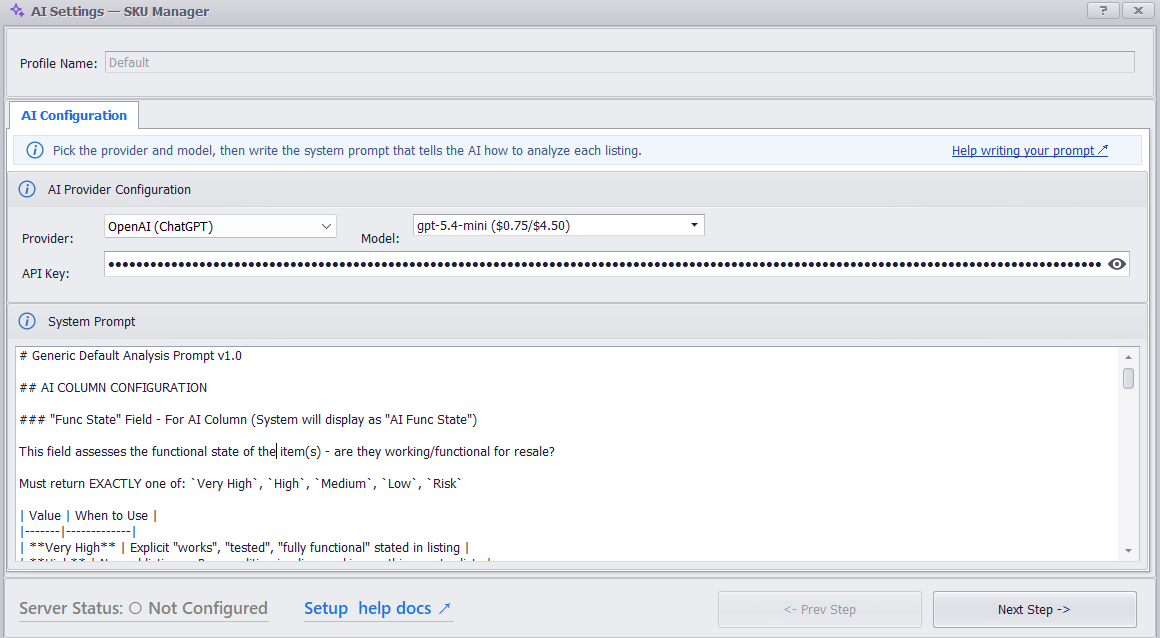
1. AI Configuration #
Provider, model, API key, and your system prompt all live here. The prompt box arrives with a generic sample prompt in it — replace it with yours.
- Profile Name: on a first install this is fixed at
Default— nothing to do here. Once naming is available, give each profile a clear name — it’s easy to forget. - Provider: OpenAI (ChatGPT).
- Model: gpt-5.4-mini is the recommended default — good quality, low cost, and it reads images. The dropdown shows each model’s price per million tokens (input / output).
- API Key: paste your key. It is masked after you paste it; the eye icon shows it again.
- System Prompt: select the sample text, delete it, and paste the full prompt from your AI assistant.
Click Next Step.
Image Analysis Needs a Vision Model.
Use a current model like gpt-5.4-mini. Do not use
gpt-4o-mini/ “GPT-4-mini” — it can’t read images, so any photo-based analysis will fail.
2. Fields & Columns #
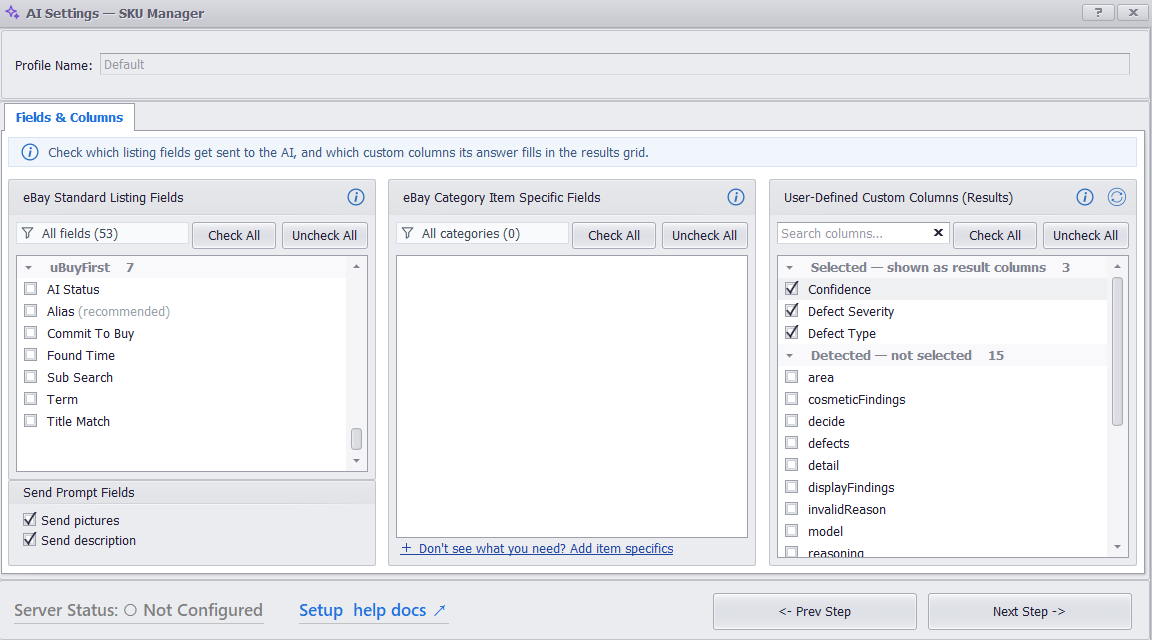
- eBay Standard Listing Fields — grouped by section, with a count per section and a search box. Tick whatever your prompt needs to read (Title, Condition, Condition Description, Total Price, Brand, Returns…). Fields tagged (recommended) are a safe starting set.
- Send Prompt Fields — under the list. Send pictures and Send description are ticked by default. Leave them on: photo-based analysis needs the pictures.
- eBay Category Item Specific Fields — leave empty unless your prompt needs item specifics. Add item specifics at the bottom opens the Custom Columns finder if you do.
- User-Defined Custom Columns (Results) — your AI output columns, read from the prompt you pasted. Ticked ones sit under Selected; the rest under Detected — not selected. Tick the ones you want in the grid.
Click Next Step.
3. Display Template #
Paste the HTML display template from your AI assistant, then click Finish Setup — this saves your profile and starts the AI server (Server Status turns to Running). It takes a moment; then close the dialog.
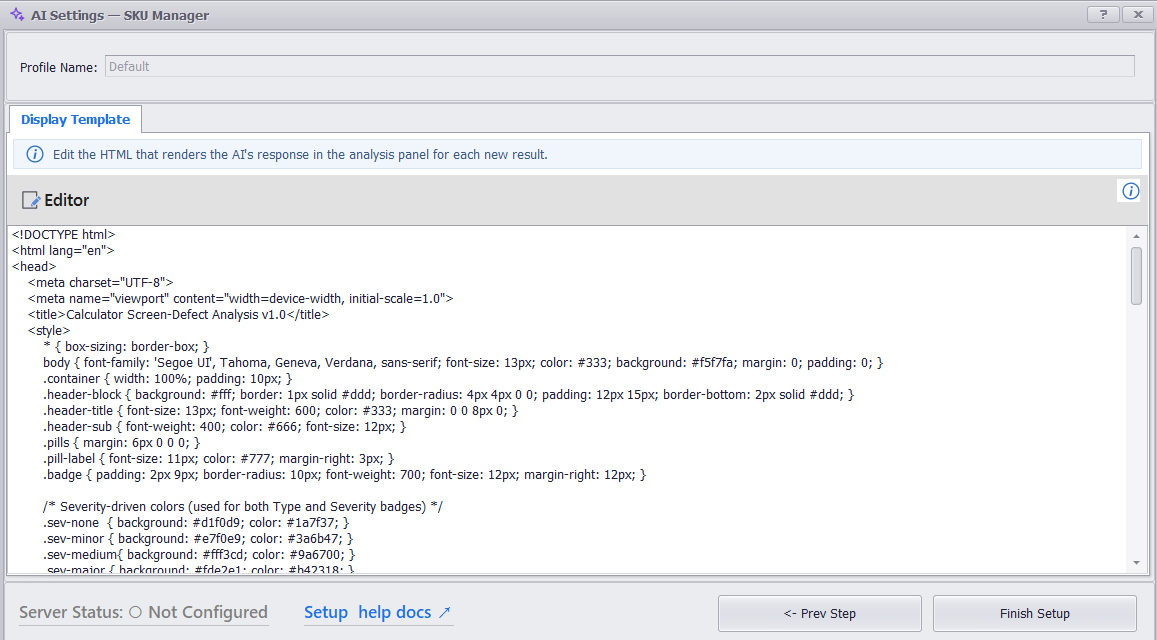
Coming Back to Edit a Profile.
The wizard only runs the first time. Reopen AI Settings on a profile you’ve already set up and the same three steps appear as tabs — AI Configuration, Fields & Columns, Display Template — with a Profile dropdown across the top. While the server runs the config is locked: click Stop Service [Edit Configuration], make your change, then Start Service [Save Configuration]. There is no Finish Setup button in this mode.
Adding AI Columns #
AI Columns are grid values the AI fills in for every listing — short, exact values (like Can Return: Yes) you can scan, sort, and filter on. They’re part of your system prompt, not a separate feature.
1. Define the column in your prompt #
Add an entry to the ## AI COLUMN CONFIGURATION section of your prompt — a name and the exact values it can return:
## AI COLUMN CONFIGURATION
### "Can Return" — AI Column
Must return EXACTLY one of: Yes, No, Unknown
Exact Values Matter.
The grid groups, sorts and filters on these values verbatim. Keep spelling and capitalization consistent (
Yes, notyesorY), give each column anUnknownfallback so it’s never blank, and make sure the values can’t overlap.
2. Switch it on #
- Open Data → Ai → AI Settings and select your profile. Click Stop Service [Edit Configuration].
- On the AI Configuration tab, update the System Prompt so it includes the new column.
- Go to the Fields & Columns tab. Your new column is under Detected — not selected — tick it.
- Click Start Service [Save Configuration]. It shows in the grid on the next run.
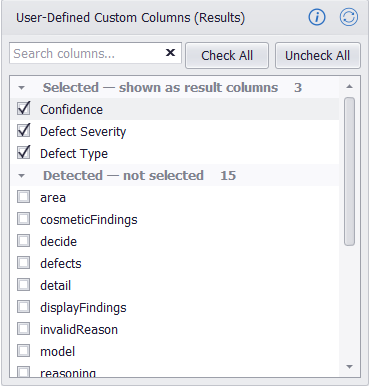
Not Showing Up?
If a column isn’t in the custom-columns list at all — not even under Detected — the prompt didn’t define it clearly — recheck the
## AI COLUMN CONFIGURATIONentry (exact name, exact values), then reopen the profile so it re-reads the prompt.
Create the Trigger Filter #
The filter is what runs your analysis — it watches your searches and applies your profile. AI analysis will not run without a filter.
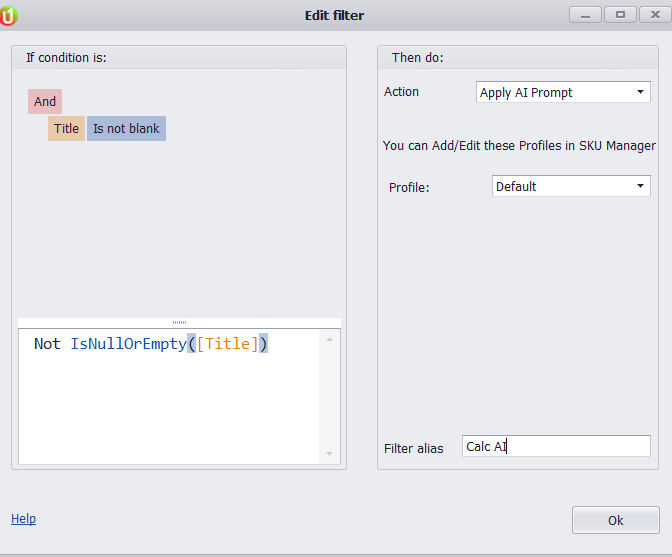
- Go to Home → Filters and add a filter.
- Condition: anything you like — a simple catch-all is Title Is not blank, or match on a keyword.
- Action: select Apply AI Prompt.
- Profile: choose the profile you built (it carries the prompt, fields, columns, and template).
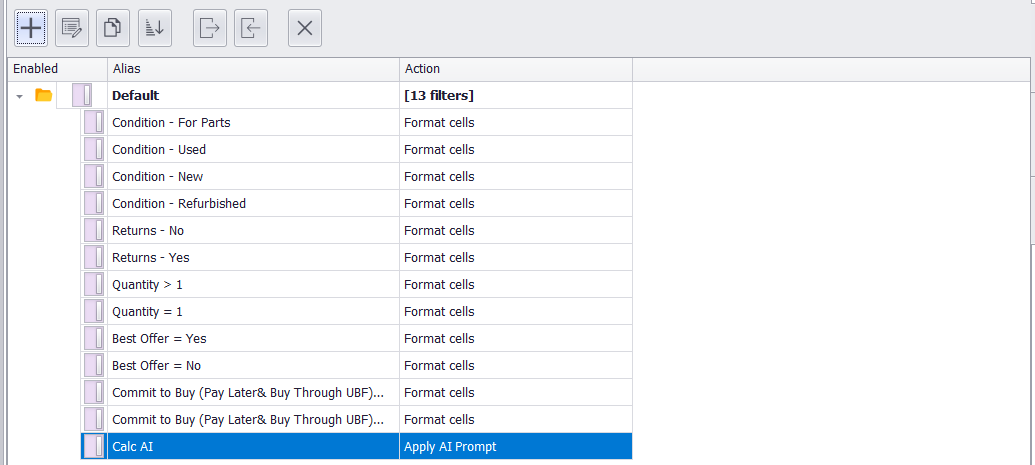
- Set a Filter alias, click OK, and make sure the filter’s checkbox is enabled.
Enable the Checkbox.
A freshly-created filter can come in disabled. If the AI never runs, check that the filter’s Enabled checkbox is ticked first.
Start & Test #
- Make sure the AI Sku Analysis panel is visible (View → Panels if not).
- Start Server: it usually starts automatically after Finish Setup. If the panel still says the server isn’t running, click Data → Ai → Start AI Server.
- Set up a search your filter will match. The analysis only runs on listings the filter catches — search for something else and results arrive with no analysis at all.
- Start the feed: click Start (Home tab, or the bottom status bar).
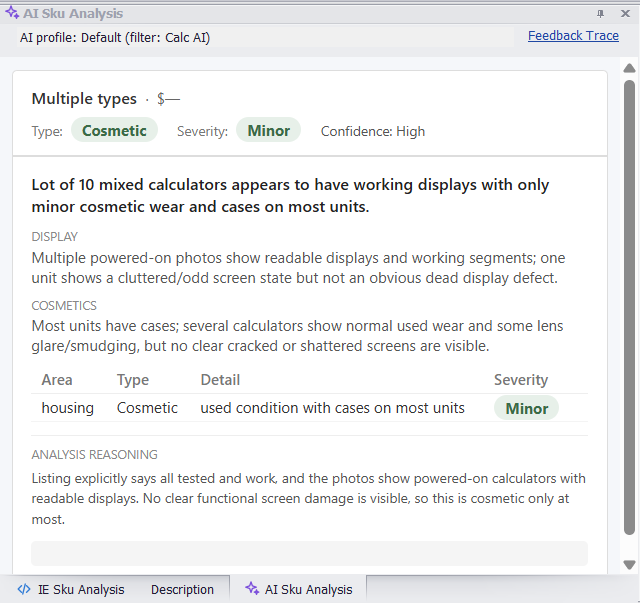
- Each new listing shows Not analyzed in the Current AI Status column, then Analyzed a few seconds later (it’s reading photos). Click any analyzed row → its analysis renders in the AI Sku Analysis panel, and your ticked AI columns fill in the grid.
Starting the Server Analyzes What is Already in the Grid.
Rows already loaded when the AI server starts are analyzed straight away, even with Analyze new listings only selected. Every row is a paid call. Click Clear results before starting the server if the grid is full, or cap it first at Grid → Initial Results Max.

Working Correctly.
The panel shows a formatted analysis, rows read Analyzed, your API dashboard shows successful calls, and (if used) your AI columns show values.
Re-running One Listing #
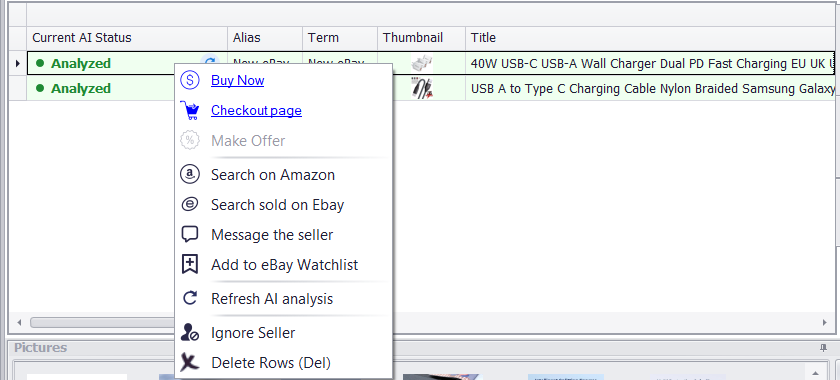
Right-click a row and choose Refresh AI analysis (or click the circular arrow in its Current AI Status cell). The app warns that a row already analyzed will be charged again; click Yes to run it. Results are kept for the number of days set in Keep results (days) on the Data tab, and survive a restart, so a listing is not re-billed just because you reopened the app.

Feedback & Traces #
When an analysis is wrong, submit feedback. It captures a trace — a complete snapshot of that analysis (the data sent, the exact prompt, the AI’s response, the images, and your notes) that you can hand to your AI assistant to fix the prompt.
How to submit feedback #
- Select the listing (with its analysis showing) and click the Feedback Trace link at the top right of the AI panel. The listing is frozen at that moment, so the grid can keep moving underneath.
- Rate the result (a row of labelled faces) and pick an issue type (Wrong Calculation, Wrong Product, Missing Info, Display Error, Prompt Issue, Other).
- Write a note: what was wrong, what the correct answer is, and where the correct info was (title, description, images).
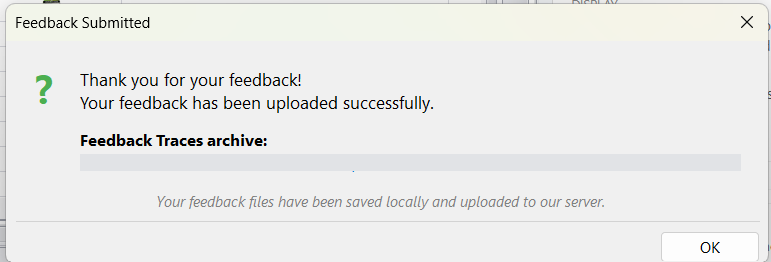
- Check the Saved with your feedback list, then Submit. The trace is zipped, saved locally and uploaded; the confirmation shows the path.


Trace files #
Each submission is one zip file, named after the listing’s item number and the time you submitted, under C:\Users\USERNAME\AppData\Roaming\uBuyFirst\SkuManagerScripts\AiFeedback\<LicenseKey>\. Open the folder with Data → Ai → Open AI Traces or the Open local feedback traces button on the dialog.
| File | Contains |
|---|---|
AI_Feedback.txt | Your rating, issue tags, and notes |
AI_RequestPayload.json | Everything sent to the model — the listing fields, the description, and the full system prompt |
AI_ResponseJson.txt | The model’s raw JSON answer, including your AI column values |
AI_ResponseHtml.html | The complete rendered output |
<Profile>_AI.json | The profile that ran — provider, model, system prompt, display template, and the fields and columns you selected. Named after your profile (e.g. Default_AI.json). Your API key is masked. |
Image_1.jpg … Image_N.jpg | Downloaded listing images |
PersonKey.txt | Identifies your licence — leave it out if you’d rather not share it |
Fixing your prompt from a trace #
- Unzip the trace and bring the files to your AI project — at minimum
AI_Feedback.txt(what you said was wrong),AI_RequestPayload.json(the prompt and the data that was sent), and any images. There is no separate prompt or template file: the prompt is insideAI_RequestPayload.json, and both the prompt and the display template are inside<Profile>_AI.json. - Ask it to identify which part of the prompt caused the issue and propose a targeted fix (before/after, not a full rewrite).
- Apply the updated prompt to your profile, then re-test the same listing with Refresh AI analysis to confirm the fix.
Troubleshooting #
No results showing #
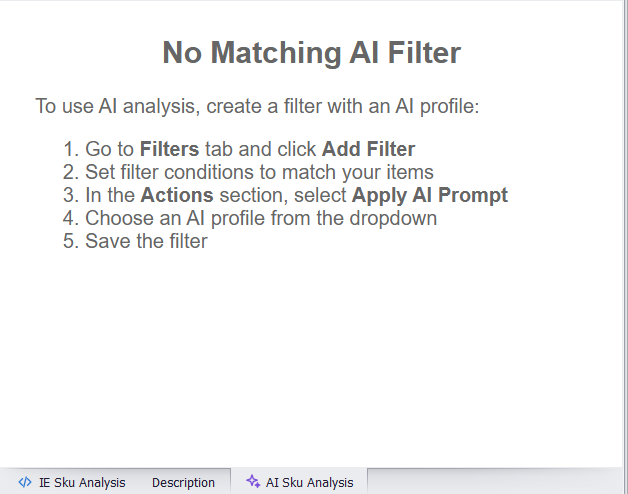
- The panel says No Matching AI Filter: no filter with Apply AI Prompt caught the listing. Create or enable the filter (the panel lists the five steps).
- The panel says the AI SKU Manager Server is Not Running: click Data → Ai → Start AI Server.
- Filter condition matches your test items, and the filter is enabled; its action is Apply AI Prompt with your profile selected.
- The feed is Started, and your search actually returns listings the filter catches.
Rows say “Analyzed with errors” #
- The server was started before a filter existed, or it was still starting when the rows arrived. Create the filter, then re-run the rows with Refresh AI analysis or restart the app.
New searches return nothing #
- A search added while the AI server is running may not pull results until you restart the app. Restart, then Start the feed again.
Extra / unwanted AI columns in the grid #
- The column list is read from your prompt’s JSON and includes every field. Reopen the profile → Fields & Columns → untick anything that isn’t a real column; keep only the ones you defined under
## AI COLUMN CONFIGURATION.
An AI column is blank / not appearing #
- The column is defined in the prompt’s
## AI COLUMN CONFIGURATIONwith an exact name and exact values, and is ticked under User-Defined Custom Columns (Results). - Reopen the profile after editing the prompt so it re-reads the columns.
Template showing raw JSON #
- Template HTML is valid and was saved; placeholder names match the prompt’s JSON fields.
API errors #
- Billing is active on your API account and the key is correct.
- You haven’t hit a usage limit; test the key in the provider dashboard.
The feed stopped after I stopped a server #
- Stopping the AI or IE server can stop new listings reaching the grid until the app is restarted. Restart the app.
Best Practices #
- Start simple, get one round-trip working, then add complexity and test each addition.
- Keep all your prompt/template work in one AI project so it builds on context.
- Use AI columns sparingly (roughly 5–10) and keep prompts focused.
- Use feedback traces to make targeted fixes instead of rewriting the whole prompt.
- Clear the grid before starting the AI server, and use Refresh AI analysis deliberately — both are paid calls.
Build V3.6.1.0 — Enterprise License Holders Only. · Live Support at uBuyFirst.com · su*****@*******st.com


